

![]()
Do you have an idea for our forum? Please click here to send it to us!
How to Sew on a Button |
|
Step 1: |
Things Y0u'll Need: Thread Needle Button Scissors Sewing Kit |
| Step 2: Choose thread that either matches the thread color used on the other buttons, the color of the button or the color of the material. |
|
| Step 3: Cut a piece of thread about 1/2 yard long (approximately finger to elbow). |
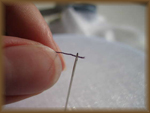 |
| Step 4: Thread the needle, feeding the thread through the eyehole. |
|
| Step 5: After the thread is through the eyehole, move the needle to the middle of the thread and fold the thread in half. Tie a knot at the end of the thread, where both ends of the thread meet. Tie another knot, so that the end is doubly secure. The thread should now be doubled and ready to sew. |
|
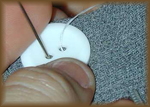
| Step 6: Place the button on top of the material where you intend to sew it into place. You can put a match or toothpick in between the button and the material to give it the necessary slack. |
|
| Step 7: From under the material, push the needle up through the material and one of the holes on the button. Pull all the way through until the knot is anchored against the material. |
 |
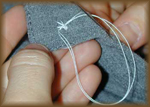
| Step 8: Push the needle down through the next hole on the button and through the material. |
|
| Step 9: Repeat steps 7 and 8 three times, going up and down through the hole on the button and through the material, so that each hole is secured by multiple strands. |
 |
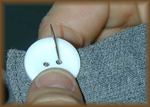
| Step 10: End with the needle on the material side and secure it with a knot. Double-knot this end. |
|
©2009 Petree Design Studios